

Time for a break from lithium batteries. Even if you readers don’t need it, your never-humble scribe does!
Also, it’s time we reminded ourselves that there are way more important things that contribute to a safe and fun offshore cruise. The best lithium battery system in the world will seem pretty insignificant if a deck fitting tears off the deck…or even if it just leaks over our bunk.
And because my fingers are tired after all this lithium battery blather, let’s make it a photo post…Johnny likes pictures…
Last winter I mounted several pad eyes and remounted two blocks on our new-to-us J/109.
Over the years I have done a bunch of this work on cored fibreglass boats, most notably every single damned fitting and track on my Fastnet 45 because the builder had not removed the core in the way of fittings, so it had compressed and the boat was a mass of leaks.
Still, even with all that experience, it always surprises me how complicated mounting fittings can be, and how many steps are required to do it right, as well as how much I learn each time.
Given that just about every fibreglass boat owner will be faced with this task, this will be useful to many of you.
And this project was particularly interesting because two of the blocks were mounted on angled Delrin shims that had failed.
Let’s dig in to what I did (with a lot of photos), including a few thoughts on things I could have done better. The day I finish a project convinced that I have done it perfectly will be the day I retire from boats—that kind of hubris is dangerous.
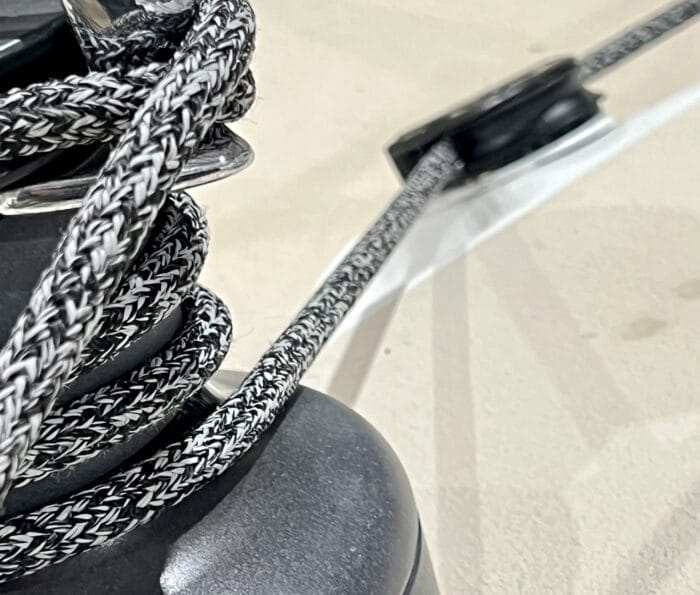
The Challenge
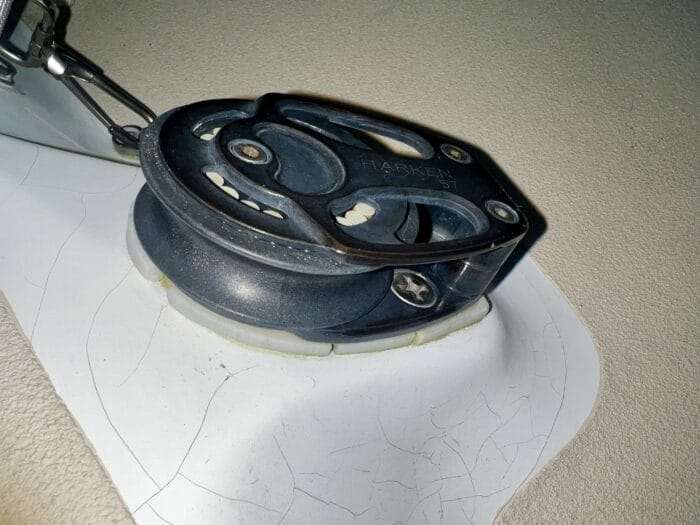
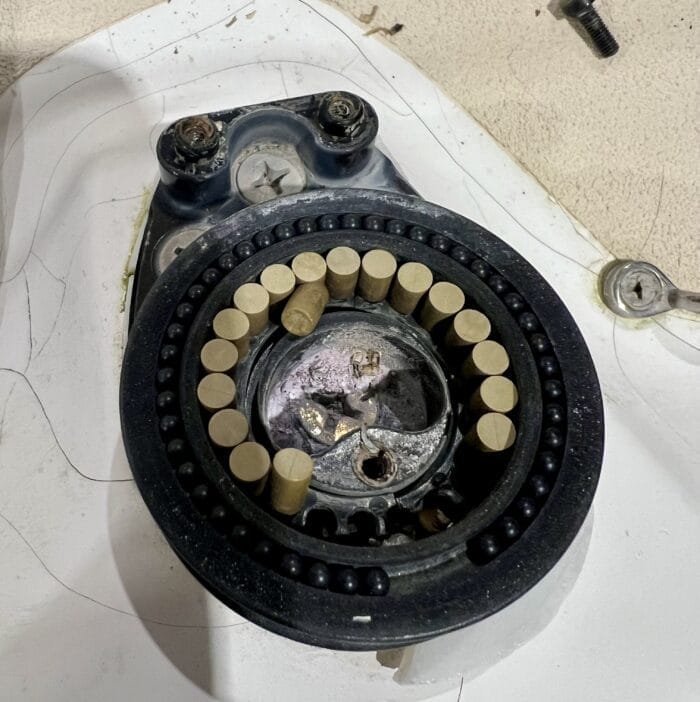
The jib turning blocks were mounted on Delrin shims that had, after 20 years, failed from sun exposure.
What a mess. Also note that the bolts are bent because the builder did not install a backer plate parallel to the base of the block, a common mistake when installing fittings at an angle.
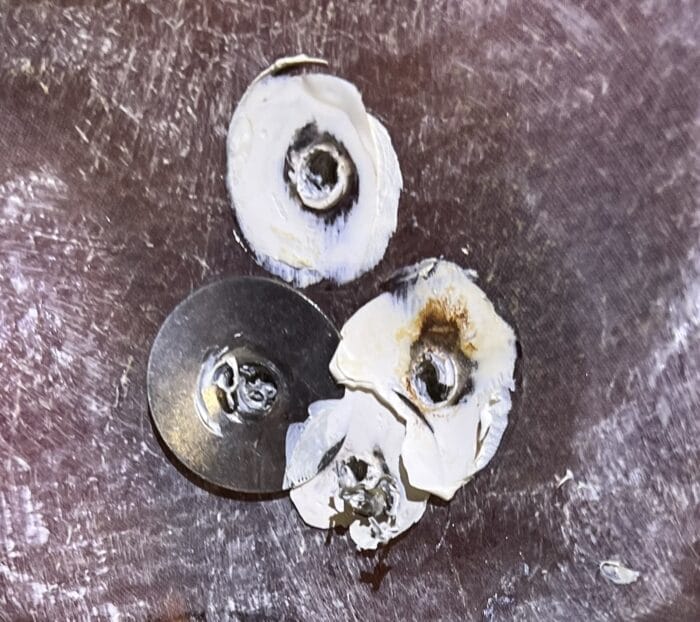
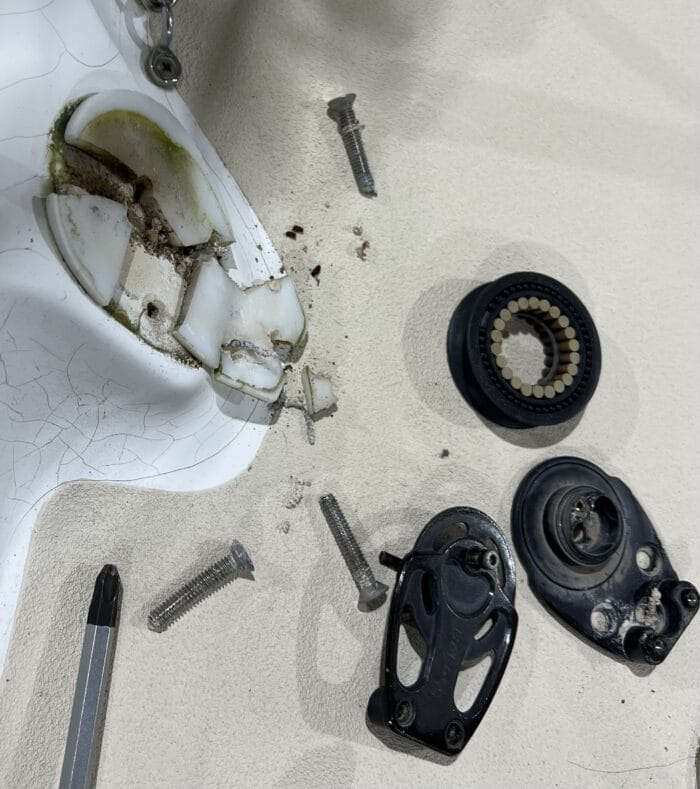
And its gets really ugly underneath. At least Tillotson Pearson had removed the core, so no worries there. But then they had committed an all-too-common crime: Using over-sized washers instead of a proper backing plate.
The block might have been rebuildable but, as a general rule and particularly after 20 years, I believe in replacement, particularly of any deck fitting with moving plastic parts.
Sounds extravagant I know, but if we really want to get out there sailing, rather than spending all our time working on the boat, replacement is often the way to go.
There are few things more heartbreaking than going to all the trouble to fix the mounting right and then having the old fitting fail, particularly if, as is common, an exact replacement for the old fitting with the same bolt pattern is no longer available.
And that brings up another tip. One of the big advantages of replacement over rehab is that the new fitting can easily be repaired or replaced for more years into the future if it gets damaged.
New Angled Shims
So how best to replace the shims? Making a compound angled shim from plastic is actually quite difficult and time consuming, even for a machine shop. And, anyway, there’s a better way:
I’d definitely appreciate more articles like this!
Any recommendations for folks that don’t have a drill press / etc at home?
I’d like to second that motion; and call for a simple voice vote.
Hi Karl, thanks for the guidance. Anyone else have any thoughts on that? I’m listening.
Excellent article and excellent photos to illustrate all of the steps. More articles along this line would be most welcome. Thanks!
Hi Alan,
Will do, and thanks for the input.
All for it.
very useful
Ditto! And the photos were very helpful. They do say a picture’s worth 1,000 words. This is exactly the kind of information I can apply to my own situation. VERY HELPFUL!
Hi Carlie,
Thanks for the direction on that, it’s always good to hear what resonates. As to a drill press the only advice I can give is buy one. Just such a useful tool. If I could only have one workshop tool, that would probably be it. You don’t need a big expensive one. Ours came from Home Depot and was not a lot of money, if I recall. Of course if you live in an apartment that’s not going to work.
If a drill press won’t work for you, how about one of these: https://www.busybeetools.com/products/drill-mate-accu-milescraft.html
That’s the one I have and, with care, it works great for most small jobs.
John, I’m 72 as well and just bought my first sailboat 2 years ago, ’91 Gozzard 31. I can’t tell you how valuable your articles have been, as I’m almost as nuts (technical medical term) as you are and I really appreciate the detail. More like this one 😉
Hi Justin,
Good to hear that alternative press works, thanks.
And thanks for the kind words. Good on you for taking on something so new and challenging at our age. Not at all sure I would have the same intestinal fortitude.
Another vote for this kind of article. I found the description how to make the shim and details like the countersinking for the technical-term-goop very useful. Knowing about those details allows one to use them when necessary.
Hi Jo,
Thanks for the input. Will do, I have another one brewing.
I appreciate the rationale of what to do (and what not to do) so I can apply it to other projects. Great write-up!
Also for non-leak goop…what’s your opinion on butyl sealant?
Hi Ben,
Thanks for the kind words.
I hear good things about butyl, but have never used it personally. One thought: I don’t think I would use butyl on a high load fitting like a turning block since I would worry that it would be difficult to get the right torque to stay put over time, but that’s just a guess, since I have never actually tried it.
I use butyl (more specifically, ‘Bed-It’, which is a butyl hybrid), but typically in combination with the ‘over-drill holes/fill with epoxy/re-drill to fastener size/countersink/make butyl donuts around bolts to fully fill countersinks and seal threads/torque from bottom nut holding bolt/screw stationary’ method as inspired by Rod Collins.
I do this even with plywood coring (and always with foam or balsa coring) with the idea that any inadvertent leakage would be more nuisance than threat to structural integrity.
Of course, I don’t do this below the waterline!
…and YES, more articles like this please! Brilliant!
Hi Scott,
I will be getting into replacing core in the next one. In this case I was fortunate in that TPI had already removed the core and added some solid laminate in the way of the block. Do you have a link to Rod’s method, always interesting to see how he does it.
Hi John,
Here is the link to Rod’s rather lengthy (but informative) article on the topic of bedding with ‘Bed-It’:
https://marinehowto.com/bed-it-tape/
He has a separate article that addresses the ‘Overdrill/Epoxy/Re-drill’ cores technique (which also discusses ultimate sealing):
https://marinehowto.com/sealing-deck-penetrations-to-prevent-core-rot/
I feel that the countersinking of holes AND only torquing the bottom nut (while holding the bolt/machine screw stationary – often requiring two people) is key to success. In my experience, the Bed-It material in the countersink chamfer will maintain sufficient thickness regardless of torque value AND if a sufficient ‘donut’ is used around the fasteners (well proud of top of chamfer), the Bed-It will be forced into the fastener threads upon said torquing.
I honestly do not trust ANY sealant 100% and put much more faith in the overfill and epoxy treatment of any hole in a cored area – especially with blind holes!
Thank you again for addressing this topic, and looking forward to more!
Hi Scott,
Great, I will have a read through. There is always something new to be learned from Rod.
And yes, if there is core, I agree, it must be removed and filled. More on that in the next one.
Having built and maintained many boats and sailed a bit including a 6 year circumnavigation I have done a fair bit of mounting and re-mounting deck hardware. I think this article is excellent and I think additional similar articles would be great for all of us to see regardless of out background.
Hi David,
Good to hear, and thanks for the kind words.
Hi John,
I see that we had some overlapping projects this offseason. We redid all of the hardware on our cabintop which included epoxy filling all the holes. Thankfully the original Butyl held up really well and there was 1 big leak requiring repair and 1 minor leak out of at least 50 fasteners with no hole chamfering. I am always amazed at how time consuming this sort of work is.
I totally agree on the importance of chamfering the holes. I have become a fan of Bed-It Butyl although it can’t be used for everything. Besides having a very good track record for long term sealing, I really like that I am not constantly opening new tubes and worrying about them drying out or aging out plus it is a lot less messy. The only failures I can think of were related to petroleum products breaking it down. Our boat even came from the factory with Butyl on the thru hulls and none were leaking when we got the boat although RC strongly discourages this sort of application.
I will have to try your method of the filled epoxy shim. I have always found it easy enough to just make a starboard or G10 shaped shim but I can definitely see the appeal and occasionally I run into a crazy geometry that is a real pain to make.
With regards to your controversial method of not drilling out the epoxy threads, I think it isn’t as bad as it might first appear because you are properly torquing prior to installing the nut which is key as it gets the bolt in tension. What you are doing is a little like using a jam nut which is never ideal but is a viable method in certain applications. The narrow jam nut (or backing plate for you) actually goes on the inside. It is a good idea to put a washer in the middle as not only does it provide a small amount of length to stretch, it gives a hard enough surface that with a little lubrication, you can get a proper torque.
Eric
Hi Eric,
Well that’s good to hear. I was fully prepared to get taken to the engineering wood shed on that one!
And good to hear that you have found chamfering the holes works well. It’s one of those things that just seams right, but one really can’t prove in practice, so the more real world experience the better.
One other question: I can certainly see the benefits of Butyl, particularly less mess than goop. What’s your thinking on my worry (further up thread) on it interfering with getting a good stable torque on a high load fitting?
Hi John,
Yes, I think if you are torquing the bolt from the top, butyl will mess with the torque to tension relationship for 2 reasons. The first reason is that butyl does not give a nice low friction surface. The second is that butyl squeezes out slowly, especially when it is cold out so you can use it just fine at 30F but you need to do everything slowly. Given butyl’s properties, I think it may be dependent on how quickly you torque the bolt. Even when you are torquing a nut below, you need to wait a minute for the butyl to squeeze out on the other end before going to final torque.
I personally try to avoid torquing from the outside with butyl involved. My observation is that if you spin a screwhead with butyl on it, you can wipe a lot of the butyl out the top. I think the only fasteners that we have that are done this way are the stops for our jib tracks which are just screws in to the deck. We have always used butyl on them and then never leak but when I take them out, the butyl coverage on the taper portion of the head isn’t great but in the chamfer it is great and that does a plenty good job of sealing. I haven’t properly looked at this, I just know that I try to avoid spinning the screw head. Maybe butyl and your method of leaving the threads in the backing plate are not a great mix due to the need to torque from the screw side?
One other thought. I have taken to lubricating the threads where they contact the nut. Part of this is to get a nice K factor but an equally big part is that when using 316 hardware, galling can be a real mess both when assembling and if you take something apart mid cruise. Depending on what the hardware is, I will use tefgel or Loctite 243. The issue with doing this is if you have to take it apart you can get cross contamination. Butyl seems quite contamination tolerant (I have certainly tested it with way more dirt than is good a few times) and you can usually pull most of it off if needed so I replace a lot less screws than in the days of polysulfide where I replaced every screw I removed to try to get a good seal.
Eric
Hi Eric,
Thanks for an interesting fill on that.
Particularly good to know about lubricating the nut. I did not do that with the jam nuts, but then they had boatlife on them that seems to act as a lubricant? I seem to remember you saying in another comment that Loctite does not change the K factor, but when you use Ted-Gell what K factor do you use?
Hi John,
Loctite does lower the K factor a little and maybe more importantly it makes it more consistent as there is a lot of variability in dry fastenings. I use 0.2 when using Loctite 243.
I am unaware of an industry standard K factor for tefgel. I have in my notes that it is okay to use the same torques as Loctite 243 but they don’t say a source and I can’t remember where I got that. My guess is that if anything, it is a little lower. For reference, anti-seize is generally in the 0.13-0.18 range and using 0.15 for calculations is relatively standard.
Boat life in an uncured state will likely do something similar to tefgel but I don’t know of a verified number that people are using. In engineering type applications, I don’t think that specifying having this on the threads would be very common although I know it is the way it is on an awful lot of boats.
Eric
Hi Eric,
Thanks for the fill. I will add those numbers to my boat notes file.
More please. As someone who dreads drilling into a perfectly good deck that thankfully isn’t leaking at the moment I welcome all the advice I can get on keeping up the good work of others. The more detailed and specific the better.
And can I say, not in the spirit of criticism, that when a new article on lithuim pops up I am reminded of the the comment of one of JRR Tolkien’s fellow dons when he would read his latest chapter to them in an Oxford pub during the war « not another ****ing elf ». Judging by the volume of comments to the lithium articles I am very much in the minority. However concerns over leaking decks are much more my thing. Romantic, eh ?
Hi Mark,
Thanks for the encouragement. And I would say you are have your priorities right. A single deck leak, which will always be in the worse possible place (Murphy), on a multi day passage at sea will make the best and coolest electrical system insignificant. And if that leak is over the sensitive electronics required for lithium…
Very timely article for me as I’m in the middle of mounting a couple of padeyes for jacklines and a new stronger bow cleat in a balsa-cored deck. Holes overdrilled and epoxy filled Will install hardward and G10 backing plates next week. I was on the fence about countersinking the holes so it was helpful to have your opinion and experience as well as others in the comments supporting that route. Also good to hear your experience, an others, regarding sealants. I’m intrigued by Eric Klem’s comments about
Bed-It Butyl as I’m loath to waste a tube of sealant for a few screws.
QUESTION FOR JOHN: How long does an open tube of Boatlife caulk stay workable for you (looks like a resealable top in your photo)?
Definitely interested in more such articles and in your readers thoughts and opinions on sealants – definitely a place to learn from experience as it takes years for us to run our own experiments!
Hi all,
Another vote for Butyl Rubber, Bed-It, which I also get from RC/ Marine How-To. I have done all bedding on the deck for a decade now with BR and have been very pleased. RC’s site has a photo essay on its use, if my memory holds. My best, Dick Stevenson, s/v Alchemy
Hi Dick,
Sounds good, although I’m still interested to hear Eric’s thoughts on the torque being uneven and/or drifting with Butyl.
Hi Kurt,
That’s one of the cool things about Boatlife, it’s actually water (humidity) that kicks it off so with the cap on I find a small tube like the one shown will last a year or more.
Excellent essay. Thx
You may want to wear gloves, protective clothing , a breathing mask, and run a vacuum when you sand or otherwise work with semi-cured epoxy. Some people have pretty nasty allergic reactions to this stuff. When it has been cured with some heat applied, it is usually no problem.
I second measuring by weight using a postal scale. However, the scale might not be as accurate than the digital number imply. Mine jumps in 6gram increments, which matters in very small batches.
the filler powder isn’t great for your lungs, either.
Westlake sells epoxy paste, it works like a charm, but you need a mixing insert for your drill if you do more than a kg. Up to 3 kg at a time works well, with more, there may be premature curing due to exothermic heat. For small amounts, westlake has it in dual cartridges, which is really convenient. Up to 1/2 a kg, if your time has any value, it’s worth considering.
i use a sander where the vacuum connects directly (Festool has a really good setup with HEPA filter) that works really well when filling and fairing keel and rudders.
Hi George,
Good point.
I was wearing a repertory and gloves from the time I opened the filler can to the time I was done, as recommended by the folks over at West.
That said, I can’t see that curing with heat would make any difference to the toxicity of the dust. That’s assuming that it is fully cured, of course.
Interesting about the epoxy paste, and I can see it for large jobs, but I would want to know that it has the same amazing strength as West with 404 before using it for this purpose. Many of those premixed products are formulated for fairing and easy sanding and therefore have poor strength. The other issue is getting the harder properly mixed with a material that pre-thickened. And finally I like the West products because I can mix small amounts to different consistencies with different thickening agents (they make five) depending on what I’m doing.
Hi John,
It needs to be completely cured for it not to be toxic and depending on the formulation, it may get hard and strong at room temperature but not completely cured until the next really hot summer day.
West, obviously, if fine, having been around forever and successfully used in the boating context. Getting a custom consistency may also be useful.
I use EPIKOTE# Resin and EPIKURE# Curing Agent, and that has a perfect consistency for shaping and fairing, but it can also be used for gluing. Both have the filler mixed in and these chemistries with or without filler are used extensively for wind generators. I haven’t done a test, but I would be very surprised if there were a difference in strength. It ain’t easy sanding when its hard ;-(
The mixing is easy; the resin is yellow and the curing agent is blue; when your paste is a consistent light green, you are good.
Hi George,
For some of us who are a bit confidence challenged, light green might be elusive. I can see myself adding a little blue: then a little yellow: repeat. Until the tubes are empty and I just have to go with the last mix. And then it will have started to kick off.
But good to know and I will take a look.
My best, Dick
I too always countersink and love butyl tape. For thick shims I like to use 3M Marine high strength filler. It’s vinylester with glass fibers, and the right thickness right out of the can. Easy to mix, with no blush, and much less shrinking over time then epoxy. Unless you pre cure your epoxy with additional heat, the first time the summer sun heats that up the epoxy will shrink and there goes the torque spec on your bolt
Hi Todd,
I really don’t think that’s right about epoxy shrinking if not cured with added heat. Pretty much the opposite of what I understand from the West documentation.
Sure if it’s a prepreg epoxy designed for heat cures that was not fully cooked off that will be the case. But West is designed for room temperature full cure, or even down to about 4C if we use the fast hardener.
Also, at least in general, epoxy has higher strength than polyester or vinyl ester that’s used in the 3m product But at least vinyl ester is a kind of epoxy so probably pretty good too.
There are a lot of mythes out there about epoxy. Another is that it won’t wet out cloth properly. I had a boat yard guy telling me that the other day. A typical myth in that it’s part true. If we use cloth intended for polyester, it won’t, but if we use the right cloth and technique, it wets out fine. That said, I have given up arguing with boat yard guys, just not worth my time.
I have been using West products for some 40 years now, and I can’t tell you the number of myths I have heard that turned out to be incorrect.
In summary, epoxy is used for high end race boats for good reasons.
Hi John and all,
Back 40+ years ago West System also had great written instructions which were a great help in the beginning and I suspect they have just gotten better. I learned a lot and got many ideas from reading their support literature. And I appreciated feeling like I did not need a PhD in chemistry and materials use their epoxy and fillers/additives as did some of the other brands. I suspect there is excellent U-Tube tutorials by now also.
My best, Dick Stevenson, s/v Alchemy
Hi Dick,
Yes, and over the years their manuals have got better and better.
John I’ve been using West System product professionally in marine repair for 40+years. I know epoxy shrinks from both personal experience and from talking to the West System tech department. I called them about 30 years ago to ask why some repairs showed back up after a couple of years. They explained the shrinkage to me and suggested using heat lamps to post cure repairs to at least 120F on deck repairs that would reciever direct sunlight. Don’t take my word for it. Give them a call.
Hi Todd,
Well, I guess we will have to agree to disagree in that I have had good experience and all their documentation indicates that once West is fully cured it’s very stable. And that carries through for all epoxies. For example Chockfast is an epoxy based compound and is used for aligning machinery very precisely. I have used it to align a thrust plate and its stability and lack of shrinkage is quite amazing and that’s I hot engine spaces.
For others: Here’s a good page that busts a lot of epoxy mythes and seems authoritative that I found when researching Todd’s thoughts.
John, at least I dont see a link in your comment above.
Whoops, sorry: https://www.morganscloud.com/jhhtips/great-source-of-epoxy-use-tips/
Great essay John. I keep a sheet of G10 plate in my shop stash for making backing plates when needed.
I smiled when I saw the gel coat crazing. We also own a 2002 J/80 that was in mint condition when we bought her three years ago. We race her on lumpy/bumpy Lake Pontchartrain and we’ve seen a lot of crazing start which happens due to the normal flexing/expansion/contraction of the boat. Our Dragonfly’s has way better gel coat as it has just a couple of spots of it.
J/Boats are decently built but we’ve seen some stuff that raised our eyebrows. On the J/80, we saw rust stains coming out of the rudder pintle bolts indicating water intrusion. We removed the pintles and found the factory had mis-drilled the holes, re-drilled new ones, but had left the misdrilled holes as is and did not even bother to fill with a bedding compound. We fixed properly. The J/80 has a balsa cored deck so I always check around fittings and stanchions for core compression and delamination.
Cheers,
Bob
Hi Bob,
Yes, J/Boat construction quality is probably about middle of the road for production boats, not terrible, but plenty of mistakes to fix.
I’m guessing your Dragonfly has fewer errors, but don’t know that.
We rebedded all deck hardware years ago. I suppose it is getting time to do it all again, not looking forward to that.
Since you like pictures, John, and so do I, it appears that I have to click on each and every picture in order to see it, otherwise it is a complete blur and indecipherable. I don’t know if this is happening on your end, but I don’t believe this is your intention. It ruins the reading experience. Sorry but that is my opinion.
I can understand if the picture becomes better and improves in quality over some time to allow download, but this is completely ridiculous.
Now to tell me it is some setting in my browser because my browser works properly 99% of the time with graduated pictures.
Hi Fredrick,
Sorry, but that’s exactly what I’m going to tell you. If it were our site we would be getting a storm of complaints, both by email and in the comments, and if you check the comments you can see the opposite is true.
We are also monitored by Google and a third party monitoring service (GTMetrix) and nether are showing an issue.
What you are seeing is called lazy loading and is done on pretty much any web site that cares about performance. What should happen is that after a fraction of a second the top photo will clarify, and then as you scroll down each subsequent pic will fully load just before you get to it. Without lazy load you would have to wait for all pics and text to load before seeing anything.
That functionality requires a modern browser so it could be you are using an old version. Other things that can cause it are a corrupted cache or Javascript being turned off. Or possibly a very slow web connection.
What device and browser are you using and what’s the version on the browser? I can probably help you solve this with that information.